目次
概要
以前、SheetJSを使ってJavaScriptでExcelを編集する方法を紹介しました。
しかし、無料版だと編集前の書式が失われてしまう課題がありました。
本記事で紹介するexcel.jsを使えば無料で編集前の書式を維持することができます!
↓以前紹介した記事↓
第一弾
第2弾
DEMO
1.作業用ディレクトリ、Excelを作成
2.Excel内にindex.html、indec.js、index.cssを作成
3.index.htmlをブラウザで開く(管理人はChromeを使用)
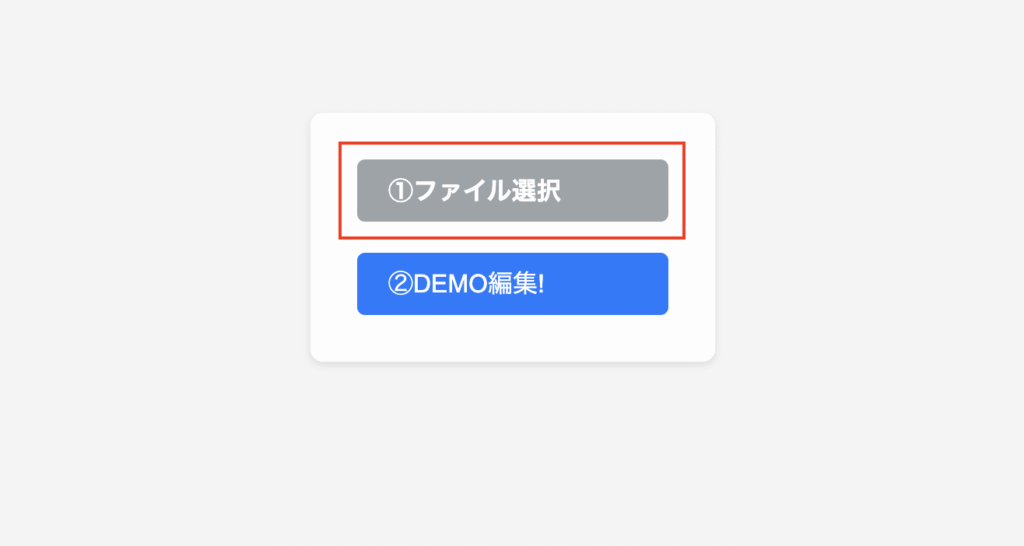
4.Excelファイルを選択
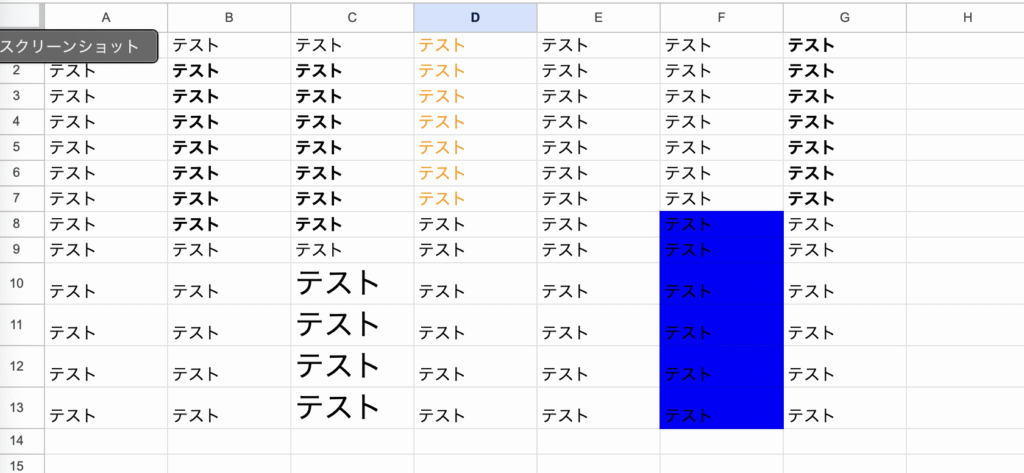
テストに使用したExcelの中身
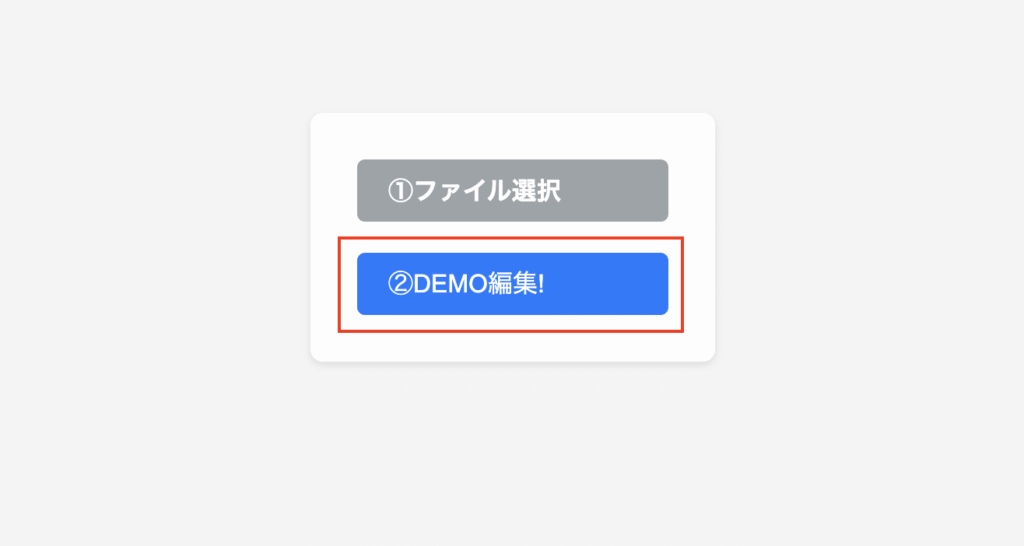
4.DEMO編集ボタン押下
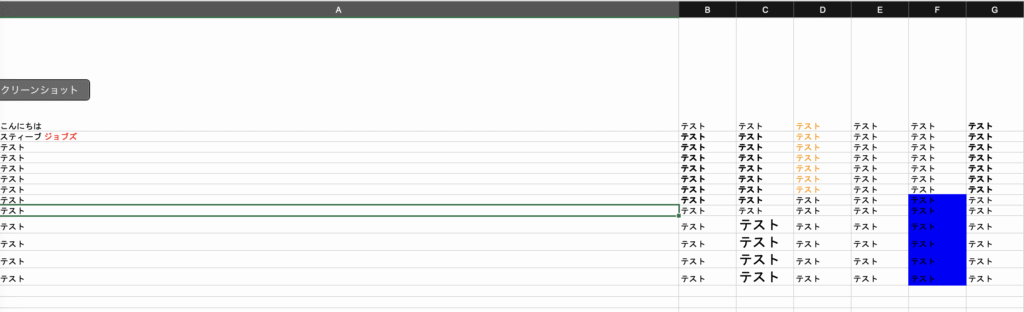
5.処理結果(処理後自動でダウンロードフォルダに保存される)
コード
注意
下記のやり方で文字色を変える時、指定したセルと完全に同一の書式のセルも一緒に変わってしまうようです。
worksheet.getCell('A1').font = {

    color: { argb: 'FFFF0000' },
    size: 65

};
このやり方だと、指定したセルのみ文字色を変えることができます。
worksheet.getCell('A2').value = {
    richText: [
      {
        text: 'スティーブ ',
      },
      {
        text: 'ジョブズ',
        font: {
          color: {
            argb: '00FF0000',
            theme: 1,
          },
        },
      },
    ],
};
HTML
<!DOCTYPE html>
<html>

<head>

    <meta charset="UTF-8">
    <title>Excel編集くん</title>
    <script src="https://cdnjs.cloudflare.com/ajax/libs/exceljs/4.3.0/exceljs.js"></script>

</head>

<script src="./index.js"></script>

<body>

    <div id="app">
        <label for="target_file">ファイル選択</label>
        <input type="file" accept=".xlsx" id="target_file"><br>
        <button onclick="edit()">EDIT!</button>
    </div>

</body>

</html>
JavaScript
async function edit() {

    const file = document.getElementById("target_file").files[0];

    if (!file) {

        alert("ファイルを選択してください。");
        return;

    }

    const reader = new FileReader();
    reader.onload = async (event) => {

        try {

            /*-----------Excel編集処理-----------*/

            const workbook = new ExcelJS.Workbook();
            await workbook.xlsx.load(new Uint8Array(event.target.result));
            const worksheet = workbook.getWorksheet(1);

            //セルの値の設定
            worksheet.getCell('A1').value = "こんにちは";

            //文字の色の指定と値の設定
            worksheet.getCell('A2').value = {
                richText: [
                  {
                    text: 'スティーブ ',
                  },
                  {
                    text: 'ジョブズ',
                    font: {
                      color: {
                        argb: '00FF0000',
                        theme: 1,
                      },
                    },
                  },
                ],
            };

            //セルサイズの設定
            worksheet.getColumn('A').width = 150;
            worksheet.getRow(1).height = 150;

            const buffer = await workbook.xlsx.writeBuffer();

            /*-----------ダウンロード処理-----------*/

            const blob = new Blob([buffer], { type: 'application/vnd.openxmlformats-officedocument.spreadsheetml.sheet' });
            const url = window.URL.createObjectURL(blob);
            const download = document.createElement('a');

            download.href = url;
            download.download = file.name;
            download.click();

            window.URL.revokeObjectURL(url);
            download.remove();

        } catch (error) {

            console.error("Error:", error);
            alert("エラーが発生しました: " + error.message);

        }
    };

    reader.readAsArrayBuffer(file);

}

/*ファイル選択後、画面にファイル名を表示させる処理*/

document.addEventListener('DOMContentLoaded', function() {

    const fileInput = document.getElementById('target_file');
    const fileInfoDiv = document.getElementById('file_info');

    fileInput.addEventListener('change', function() {

        if (this.files && this.files.length > 0) {

            const fileName = this.files[0].name;
            fileInfoDiv.textContent = `選択されたファイル: ${fileName}`;

        } else {

            fileInfoDiv.textContent = '';

        }
    });

});
CSS
/*画伯 Mr.Gemini*/

body {

    font-family: sans-serif; /* 一般的なゴシック体フォントを指定 */
    display: flex; /* Flexboxレイアウトを適用 */
    justify-content: center; /* 水平方向中央揃え */
    align-items: center; /* 垂直方向中央揃え */
    min-height: 100vh; /* 画面の高さいっぱいにする */
    margin: 0; /* デフォルトのmarginをリセット */
    background-color: #f4f4f4; /* 淡い背景色 */

}

#app {

    background-color: #fff; /* アプリケーションの背景色 */
    padding: 30px; /* 内側の余白 */
    border-radius: 8px; /* 角を丸くする */
    box-shadow: 0 2px 5px rgba(0, 0, 0, 0.1); /* হালকাShadow */
    text-align: center; /* テキストを中央揃え */

}

label[for="target_file"] {

    display: inline-block; /* インラインブロック要素にする */
    margin-bottom: 20px; /* 下の余白 */
    padding: 10px 20px; /* 内側の余白(ボタンらしく) */
    width: 200px; /* ボタンと同じ幅 */
    height: 40px; /* 高さを指定 */
    line-height: 20px; /* 行の高さを調整(垂直方向中央揃えのため) */
    font-weight: bold; /* 太字 */
    color: white; /* 文字色を白に */
    background-color: #9da3a9; /* ボタンの背景色 */
    border: none; /* 枠線をなくす */
    border-radius: 5px; /* 角を丸くする */
    cursor: pointer; /* カーソルを指の形に */
    font-size: 16px; /* 文字サイズ */
    text-align: left;
    transition: background-color 0.3s ease; /* ホバー時のアニメーション */
    box-sizing: border-box; /* padding, border を width, height に含める */

}

label[for="target_file"]:hover {

    background-color: #549ad3; /* ホバー時の背景色を変更 */

}

input[type="file"] {

    display: none; /* ファイル選択inputは非表示のまま */

}

button {

    width: 200px;
    height: 40px; /* ラベルと同じ高さ */
    line-height: 20px; /* 行の高さを調整(垂直方向中央揃えのため) */
    background-color: #007bff; /* 青色の背景 */
    color: white; /* 白色の文字 */
    padding: 10px 20px; /* 内側の余白 */
    border: none; /* 枠線をなくす */
    border-radius: 5px; /* 角を丸くする */
    cursor: pointer; /* カーソルを指の形にする */
    text-align: left;
    font-size: 16px; /* 文字サイズ */
    transition: background-color 0.3s ease; /* ホバー時のアニメーション */
    box-sizing: border-box; /* padding, border を width, height に含める */

}

button:hover {

    background-color: #0056b3; /* ホバー時の背景色を濃い青にする */

}
比較
簡易的ですが、比較表を作成しました。
スクロールできます
| 商品 | 特徴 |
|---|---|
SheetJS | ○有料サポートを受けられる ❌無料版はリッチテキスト非対応 |
excel.js | ○無料でリッチテキスト対応 ❌有料サポートを受けられない |
まとめ
無料でリッチテキスト対応で、Excel操作を行うことができました!
どっちがいいとかではなく、結局はそれぞれメリット、デメリットがあります。
比較表確認いただいて、どちらを使用するのかの判断してもらえたらと思います。
SheetJSの有料版については、お問い合わせしないと詳細が不明なので注意が必要です!
公式ページ
SheetJS
excelJS
※githubはドメインgithub.comをdeepwiki.comに修正しアクセスすると、ウィキ風になって読みやすくなります!